Showing posts with label beauty. Show all posts

Monday, 19 October 2015

Why I go Paraben Free


Hey all! As it is breast cancer awareness month, I want to share with you all why I avoid personal care products that contain the chemical preservatives parabens.  Have you heard of them?

They are found in nearly all personal care and beauty products you buy on the high street. In 2011 they were banned in Denmark in products aimed at children under the age of 3 years on the grounds of reproductive toxicity. In fact, Exposure to high levels of oestrogen before or just after birth can be detrimental for male reproductive function. Scary to think many 'nappy creams' contain these preservatives.

All parabens have been shown to bind to human oestrogen receptors and increase expression of oestrogen. Lifetime exposure to oestrogen is among other things, an established risk factor for breast cancer so much so that Breast Cancer UK publicly supports the phase out of all parabens from all cosmetics and products designed to be applied to the skin and supports an extension of EU Article 60 (3), to ensure parabens are, by default, classed as Substances of Very High Concern (SVHC).

We are all becoming more aware of what we are putting in our bodies as food so perhaps it is time to take a look at the ingredients in the personal care products we apply every day to not only our skin but our families bodies too.

For more information see http://www.breastcanceruk.org.uk/…/bcuk-fact-sheet-parabens/

I hope you found this useful.  It is not something I was aware of until a couple of years go, as soon as I became aware I made the switch :-)

Love Ashly xxxxx

Tuesday, 25 August 2015

5 Secrets to Maintaining Beautiful Hair Extensions


Hair extensions make your hair thicker, fuller, longer.  I've been having them for years, I got my first set in 2005! Wow time flies.  They become quite addictive actually! A bit like getting your nails done, they just make everything look better!

The hairdresser tells you a couple of tips and may even give you a care packet but nothing prepares you for extensions like talking to somebody who has had them for years. 

With this in mind I know how hard it is when you first get them done and you don't really know how to look after them, they are not cheap after all so you want to make them last as long as possible.

Here are my secrets to keeping your hair extensions in great condition and making them last as long as possible! 

1. Always dry your roots.
This is where the bonds will be so whenever you wash your hair make sure that you take a couple of minutes to blow dry your bonds using COLD air.  I would use the hot setting on my blow dryer and they would get all warm and soft which is the opposite of what we want. So always use the cold setting. 

2. Wash less
It's a good idea to wash your hair as little as possible to keep your bonds in tact.  Dry shampoo is a lifesaver for this.  Extensions tend to hold styles and curls a lot better so why wash it if you don't need to? You can also do a top wash.  Section your hair in half, making sure all the extensions and bonds are neatly tied in a bun at the nape of your neck out of the way, leaving your natural hair free at the top of your head. Put your head upside down over the bath and do a shampoo and condition on the loose/top part of your hair. I do this once per week between washes. 

3. Serum and mask
It's likely that the ends of your extensions will get dry because they are not attached to your head they are not getting any oil to them.  To combat this I use an all natural hair serum by arbonne on my ends everyday, it keeps them shiny.  

4. Shampoo sans SLS
One of the main reasons my extensions often last 6 months is because I only use shampoo with out nasties like sodium laurel sulphate and silicones. SLS is a foaming agent which strips away the colour and moisture of your hair.  Best to avoid these ingredients to promote longevity of your extensions. I use Arbonne FC5 shampoo and conditioner.

5. Brush gently
I know this sounds simple but it really makes such a difference.  Brush your hair very gently and hold on to the top part of your hair while you run a soft bristled brush from near your hand to the bottom of your hair.  Braiding your hair at night to keep it from getting tangled over night is a great idea too!

Feel free to share your tips on keeping your hair extensions in great condition…

Love Ashly xx

Wednesday, 18 February 2015

Pulse Light Clinic // Laser Hair Removal

When Pulse Light Laser hair removal clinic contacted me and asked if I would like to try out laser hair removal I was very excited because I have always wanted to give it a go but never got round to it.

After all who wants to have to shave everyday? Certainly not me.  Considering waxing scares the bajeesus out of me I've really had no other option.  I felt like I was continuously shaving, and I am not even that hairy (honest).

The consultation
So off I went for my consultation.  Excited yet a little aprehensive (I had heard that it hurt).

The staff at the check in desk were lovely and very welcoming, despite me turning up a little late.  I was handed a form to fill in, it was quite extensive with lots of questions like did I use sunbeds or was I wearing self tan?  I didn't quite understand these questions until the lovely therapist explained that it would depend on the light they would use.

So I pulled down my trousers and jumped up on the bed, I felt surprisingly comfortable.  I think because the therapist was so lovely and friendly.

She ran the laser across my skin, it was a strange sensation. A little nippy but nothing too sore, and I have a low pain threshold.  She adviced that I looked at the light as it was working it's magic and that made it even less nippy.

So I pulled up my rousers and that was that. All good... ready for my treatments.

1st Appointment
2 weeks later I went for my first full session which lasted around 10 minutes and felt like nothing had happened.  The only part which felt a little uncomfortable was in a few 'tender parts'. However with the cold air blowing on to my skin at the same time as the laser, I soon felt nothing at all.

Over the next few days I noticed what looked like ingrown hairs, the therapist told me to exfolaite so thats what I did and after a couple of days they all went.

Now it is 3 weeks later and I can not believe the difference already, there is so much less hair.  Instead of having to shave everyday I am now down to about once every 3 days.  And that is after my first session! I have 3 more to go and I am pretty sure that I will be as smooth as smooth can be, I can't wait!

Check back for updates!!

Ashly xxx

Thursday, 16 October 2014

Arbonne RE9 cellular renewal mask review


I aim to use the purest, cruelty free, natural products I possibly can.   This can prove difficult when you need a product that works and works well.  Today I am excited to review the Arbonne RE9 Cellular Renewal Mask (£52) for a couple of reasons.  Firstly because it is VEGAN and secondly because it actually works!

Here is what Arbonne has to say:

"Enhanced formula with gentle cellular exfoliation visibly improves skin tone and texture, minimises the appearance of pores, and provides skin with an immediate, radiant glow"

Directions are as follows:

"Use 1–2 times per week at night. After cleansing and drying skin, smooth a generous layer of masque over face, avoiding eyelids or getting into eyes. Leave masque on for 5–7 minutes. Slight transient tingling or redness may be experienced and is normal for a masque of this type. If irritation occurs, stop use immediately and consult a dermatologist. Rinse with tepid water or use a warm washcloth. Pat dry and follow with serum and night crème".

I have been using the mask as adviced and seen massive results.  At first I only left it on for 2 minutes because I started to feel it tingling, now 4 months later I can leave it on for around 7-8 minutes.  Afterwards my skin feels like silk. I do get some redness after use which disappears after 10-20 minutes.

I found it especially useful if I had a breakout, using this on 2 consecutive days would dramatically improve my skins overall condition.  It is great to know that when those pesky sposts appear, I now have something which actually helps.

I have just finished my first tub after 4-5 months and purchased my second.  The RE9 Cellular renewal mask is quickly becoming one of my desert island products.

"Algae extract supports collagen through moisturisation to help diminish the appearance of fine lines and wrinkles" and "Pineapple and papaya enzymes gently exfoliate and remove dead skin cells".

Overall I am really impressed with this product - hence my excitement to share it.

Ashly x

Monday, 6 October 2014

#LushChristmas Launch event


As most of you know I strive to only use cruelty free and pure brands for my skincare and personal care products. So when Lush invited me to review their Christmas range of course I said yes.

Lush is not a brand I currently use but I contantly see reviews and pictures on my twitter feed so thought I had better go along and see what all the fuss was about. 

100% vegetarian, handmade and fighting animal testing.

The girls at Lush Aberdeen were super friendly and kind showing us all the festive bath bombs and soaps.  I love the names they choose for everything like snow angel, yog nog and reindeer rock... very kitch!

I am not a fan of strongly scented anything so some of the products were not to my taste but there are some with subtle fragrances which I really loved like the Lush snow white bath bomb (£3.30).  I had a lot of fun with the Snowman kit too which is a great gift for youngsters, they can mould their own snowman in the bath and then use it to wash their hair.

Will you be purchasing any of the Lush Christmas favourites this season?

Love Ashly


Tuesday, 5 August 2014

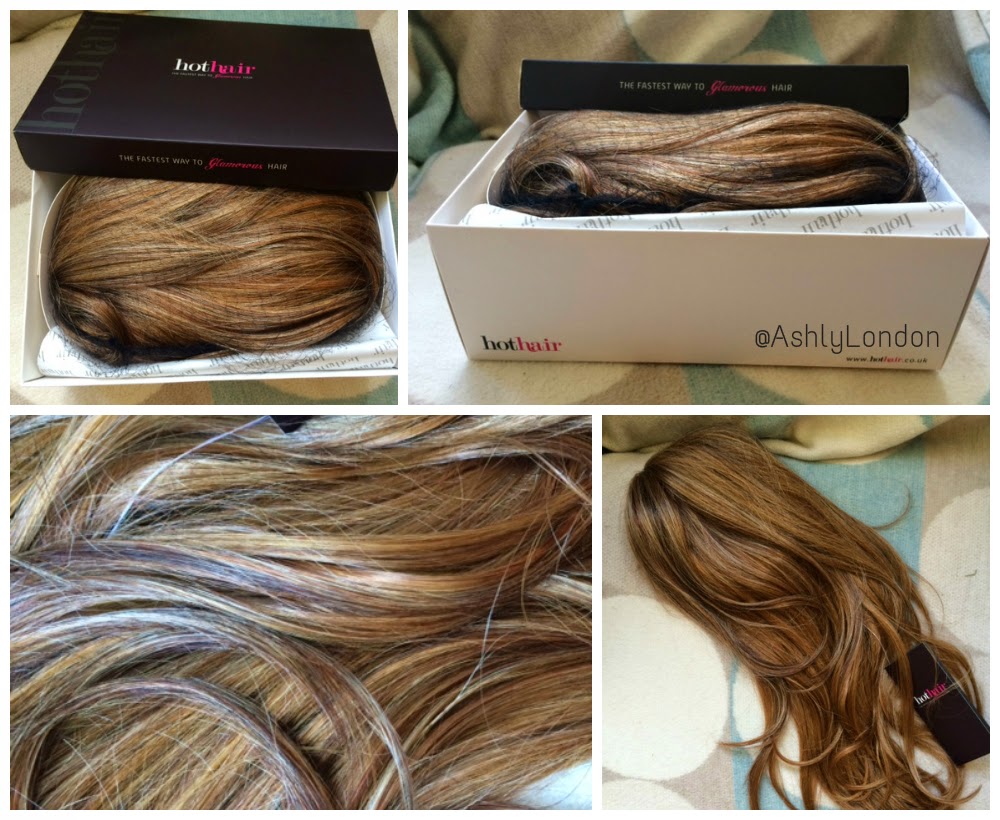
REVIEW | HotHair Brianna 3/4 Wig Glazed Strawberry*

The folks at hot hair very kindly asked if I wanted to try out one of their new hair pieces.  After the success and compliments I received using my clip in fishtail plait (review here) I jumped at the chance.

I was sent the Brianna 3/4 wig* by HotHair in the colour glazed strawberry R29S. It is a 3/4 wig with waves through the ends.  I have to say it did not disappoint. 
It arrived in a lovely box - great for storage. Wrapped in a net, with not a strand out of place.  I was very impressed.  The colour was as close to perfect as possible.  Obviously the texture is different to human hair, as this piece is synthetic.


Easy to apply, with hair grips and clips.  Takes 2 minutes to put in place (perfect if you are in a rush but still want to look fab).  You do need to cover the seam though. I back combed the front of my hair and pulled it straight back, securing in place with Kirby grips (bobby pins), which did the trick.


What I liked most about this hair piece is that it is so versatile.  You can quite easily put your hair up in a pony tail or braid the piece, it blends in really well and looks fab.  It gives your hair up that extra bit of thickness and volume, who doesn't want that?


I would say if you are going to wear this piece straight down, it is probably best worn on a night, just because the texture is slightly different to human hair.  Either that or easily wear it styled up (as mentioned previously) for the day, it looks all the more natural that way.

I have to say I absolutely love my Brianna 3/4 hair piece by Hot Hair...  Hair style tutorials with it coming very soon.


Lots of Love Ash x

Don't forget you can follow me on

Monday, 4 August 2014

GUEST POST | What Colour of Eyeshadow should I wear?


Hi everyone!! Today I have a guest post for you from one of my absolute favourite people.  We may not have known each other a long time but I know we are life long buds for sure.  Not only is she an amazing person and super gorgeous but she is an extremely talented makeup artsist too.  So listen up and make sure you go and follow her blog ...


Hi guys! Today I wanted to show you a purple look that I created. It is perfect for those of you who have green, brown, or hazel eyes. Following color wheel theory, purple is a complimentary opposite of green, brown, and hazel eyes. If you use, green shadows on green eyes, brown shadows on brown/hazel eyes - your eye color won't "POP" as much as it could.

You may be wondering what color wheel theory is at this point, NO worries! I got you covered! Let's briefly cover the basics...


COLOR WHEEL THEORY BASICS:
You may have learned about the color wheel at some point in your life. I will assume that most people reading are beginners and will explain it as such. Within the color wheel, there are PRIMARY, SECONDARY, and TERTIARY colors.
  • PRIMARY COLORS: are colors that can’t be made by mixing other colors
    • Blue
    • Yellow
    • Red
  • SECONDARY COLORS: are a mixture of two primary colors
    • Blue + Red = Violet
    • Red + Yellow = Orange
    • Yellow + Blue = Green
  • TERTIARY COLORS: are a mixture of primary and secondary colors
    • Yellow (Primary color) + Orange (Secondary color) = Yellow-orange
    • Red (Primary color) + Orange (Secondary color) = Red-orange

color-wheel

Next let’s discuss the cool and warm sides of the color wheel…
 
COOL:
  • Means the base of the shade is a blue tone
  • Example: there is a blue toned base to cool shades of purple
WARM:
  • Means the base of the shade is a yellow tone
  • Example: there is a yellow toned base to warm shades of purple
If you look at the photo below, you can see the row of purples on your far upper right are cooler shades of purple (with a blue base). Now look two rows over at the lighter purples (to the right of the burgundy shadows) – notice how they are warmer shades of purple? That’s because yellow has been added to them to make them warmer.
Why should you care? Because, knowing which colors are complimentary opposites to your eye color will help you enhance your natural features. In general, just remember, that if you have brown eyes you want to look to the opposite side of the color wheel (notice how blue, green, and purple are on the opposite of brown below). If you have green or hazel eyes, look to the opposite side of the wheel and you find purples, plums, and earth tones.

Color-Wheel

COLOR WHEEL THEORY IN RELATION TO EYESHADOWS:


GREEN EYES OR GREEN EYES WITH GOLD FLECKS:
  • Purple shadows
  • Plum shadows
  • Shimmery taupe colored shadows (with warm undertones)
  • Copper shadows (pull golden flecks forward and make green tones radiant)
  • Silver shadows

BROWN EYES:
  • Medium & light brown eyes:
    • Purple shadows
    • Plum shadows
    • Green-gold shadows
    • Copper shadows
  • Dark brown eyes: vibrant blue and navy blue
  • With brown eyes in general you can really experiment with any color!

HAZEL EYES WITH GOLD/GREEN FLECKS:
  • Purple shadows
  • Eggplant shadows
  • Warm neutral brown shadows
  • Gold shadows (pull golden flecks forward and make green tones radiant)
  • Bronze shadows (pull golden flecks forward and make green tones radiant)
  • Warm green shadows (brings forward green tones)

Many people have a hard time finding the right colors that work for their eyes, but if you can remember which colors go with your specific eye color then it makes life so much easier! This post is Part 1 of 2 posts. Next week I will be covering, Part 2: Eyeshadow Color Theory 101 For Blue & Yellow Eyes. Make sure you subscribe by email to my blog or follow my blog so that you can stay updated on all new postings! Click the video below for a full tutorial on how to create this purple smokey eye (plus a ton of tips and tricks!). Comment me and tell me if you found this helpful! I would love to hear from you :) Xoxo Amber Malei Follow my blog with Bloglovin


Wednesday, 23 April 2014

REVIEW | Stila all over shimmer luminizer pink shimmer


With summer quickly creeping upon us and spring under way, a good illuminator is definitely needed to give us that gorgeous fresh dewy look. I was given the Stila all over shimmer Luminizer in pink shimmer from my gorgeous chummy over at liparazziblog.com.

All Over Shimmer is a creamy, skin-enhancing luminizer that gives the skin a fresh, radiant glow. Soft focus pigments help diminish skin imperfections and minimize the appearance of fine lines and sun spots.

This luxurious formula can also be mixed into face lotion or your favorite Stila foundation for a touch of brightened radiance.

Normally I prefer a cream illuminator as I have found in the past applying a liquid one over a foundation or a powder bronzer can cause a mess.  However, I have had no such problem with this little beauty.

I put some on the back of my hand and either use a light brush or my finger tips to apply sparingly above my cheek bones.

I like the container and brush, it makes for no spills or waste.  It gives a lovly glow and is suitable for pale skin. The product is a cold tone, something to be aware of if you prefer warmer tones.

Have you tried this Stila shimmer? What luminators do you use?

Thursday, 10 April 2014

Review | Vita Liberata Illuminating Skin Finish Latte


Today I am reviewing the Vita Liberata Illuminating skin finish in Latte* £29.95.  Vita Liberata is an Organic self tan and skincare brand. I am a huge fan of their better known pHenominal 2-3 week tan which I reviewed here but I haven't tried any of thir other products, until now.

The illuminating skin finish comes in 5 shades, with Latte being the darkest.  It is markated as a BB bronzing cream.  I love the idea of this product and I would say it does what it is suppose to.

But lets talk about the packaging for a moment, it is so pretty and very practical. I love how it has a pump, no squashing or squeezing a tube = no mess.

This particular shade on my skin is dark so I use it as an instant wash off tan which adds a gorgeous glow to arms and legs while concealing imperfections.


It is best used with a mitt as it dries quite quickly and becomes fairly unblendable. Another way to combat this is to mix the skin finish was a moisturiser. 

Is is a necessity? No. Is it nice? Yes, I really love this illuminator and the fact that it has an spf 25 is an added bonus.

I do think £29.95 is fairly expensive but saying that it is organic so you tend to pay a bit more for a product that contains no nasties. 

Have you tried any Vita Liberata products? 

Don't forget you can follow me on


Sunday, 2 March 2014

Get Ready With Me | Alice in Wonderland Makeup

Hello beauties.

I am very excited to do this get ready with me post because it's a special dress up Alice in Wonderland for my mad hatter's tea party birthday party (that was a bit of a mouthful).

I absolutely love dressing up and was really looking forward to celebrating my birthday dressed as Alice with such great friends and family. So without further a do let's get started...

I had a shower and washed my hair in the morning. The plan was to drive to my sisters (the location of the party) finish the decorations, get everything finished then get myself ready. I ended up having about 45 minutes for this and can't quite believe I managed to do it with 10 minutes to spare.

First thing was the makeup. I searched Pinterest, as you do, for some makeup inspiration.  I love this one below but wanted to make it a little less severe and a bit more natural.

After a root around I found a blue bourjois eyeshadow trio that I had bought a while back to copy a Tanya Burr look and I found a gorgeous bright blue in an old Urban Decay palette too whoop.


I knew I wanted huge false lashes so picked the biggest ones I had by Kiss. I used a large barrel tongs and some serious hair spray to keep everything in place... et voila!


Make up used for face
Arbonne primer
Arbonne mineral powder foundation in medium beige
Arbonne bronzer
Bobbi brown shimmer brick in bronze
Arbonne blush in blossom

Makeup used for eyes
Brows - Hd brows eye brow pallete
Under eye - Bobbi brown corrector in bisque
Estée Lauder concealer in medium
Benefit erase paste in 1 
Shadow base - bourjois smokey eyes trio 06 violet romatic light shade
Crease - urban decay Deep end and Gun Metal
Tear duct -  borjois white eyeliner pencil for base
Barry M dazzle dust in 8
Lashes - Kiss false lashes in Flirt
Maybelline falsies mascara
Bourjois white eye liner on water line
Miss sporty 24h waterproof liquid eyeliner

Lips
Loreal Color Riche lipstick in 370
Arbonne lip gloss in Posh


Don't forget you can follow me on


Friday, 17 January 2014

No Oil Oil and a Dry Shampoo that doesn't make your hair white!

Hi all. Today I wanted to tell you about 2 products that I have been absolutely loving.  They are literally helping my hair routine out imensely!

Girlz Only Dry Shampoo | £1.50 Tesco
I love love love this stuff. Hands up if you have tried a dry shampoo thinking it would be your savour to greasy hair and found out it left you looking more granny than groovy? I can not be doing with all that white shiz. Luckily I found this beauty which does not leave any powder or white residue at all.  It really is superb.  I use it on my roots to give my hair some volume too.  The only downside is the really perfumey smell. For £1.50 are you prepared to give it a go?

Percy & Reed Volumising No Oil Oil | £14 Percy & Reed
I got this sample free with a magazine in the summer, pretty sure it was Marie Claire, let me know if you remember. Anyway it is fabulous and absolutely lives up to its name of 'no oil' Oil because it doesn't leave my hair feeling the slightest bit greasy or weighed down, unlike it feels with other hair oils.  I put it through the ends of my hair when it is straight or curled and it makes it gleam with healthy shine.  I also apply it to style my hair if I want a slick pony tail or have any stray hairs that need tamed, it works a treat. I am not sure how volumous it makes my hair, but it certainly makes it look fab!

Have you tried any of these beauties?


Don't forget you can follow me on

Thursday, 19 December 2013

REVEAL!! Gradient Glitter Christmas nails!!


Hi lovelies, it's less than 1 week till Xmas! I still haven't done all my Christmas shopping but I am planning on blitzing it all tomorrow morning :-) How are you all getting on? I bet your more organised than me?

Now I love a bit of glitter as much as the next gal and one thing I love at Christmas is that you can go all out over the top blinging and sparkling like a fairy on redbull.  So it was finally time for my Christmas manicure eeep!! So off I went to the nail salon to get myself all blinged out and after some serious deliberation on colours and patterns, I came back with these beauties!!


I absolutely love them.  They were £35 including infills at Polish Nail and Beauty Aberdeen.   The girls are absolutely lovely.  Especially Amy who has done my nails twice now and she is an absolute gem, always making sure I am happy with them asking "do you need more glitter" to which I reply yes!


So what do you think lovelies is there an improvement?! :-)

Don't forget you can follow me on

Friday, 13 December 2013

YSL Rouge Pur Couture Lipstick in 63 Noir Prima Donna


I was lucky enough to be given a gorgeous YSL Rouge Pur Couture Lipstick in Noir Prima Donna (no 63) from my blogger pal Rachel, what a totally gorgeous gem she is!

"Pure Colour, satiny Radience"

This 'new generation' lipstick from Yves Saint Laurent comes in a beautiful gold case which doubles as a mirror, how fabulous.  The colours are inspired by Monsier Saint Laurent's classic colour palette of red, fuchsia and orange and there are many shades to choose from.

There are even cola brown and white shades for customising and blending.  The lipstick itself has an spf of 15.


I have only worn it once so far so can't give a full review but the colour was definitely intense and easily buildable.  It felt soft on my lips and didn't seep in to the cracks even though my lips were particularly dry that day.

I absolutely love the deep colour, I have nothing like it, and the packaging is to die for.  Thank you Rach :-)


What do you think of the colour lovelies?

Don't forget you can follow me on

Wednesday, 11 December 2013

Scottish Blogger Network Secret Santa!!!


ITS CHRISTMASSS!!! Well not quite yet but we are getting so close, it is such an exciting time of year.  Everyone is in good spirits and wants to have a great time, I honestly love it.  As a blogger I am certainly having a great time, we have our Christmas night out on the 18th December and here is my 2nd Secret Santa of the year.  This time it was organised by the delightful Kirsty from Scottish Blogger Network.

I had absolutely no idea what to expect, we were set a limit of £10 and it really was a secret who my 'santa' was.  The parcel arrived in this lovely pink paper I had a little shake and feel (as you do) but as usual I had to curb my excitement and take pictures before I could rip it open #bloggerproblems ha ha.

When I did open it, I was so excited to see the Smashbox try it kit, what an amazing gift! And I'm pretty sure it is waay over the £10 so very generous.  It contains 5 little minatures including their famous photo finish face primer and the photo finish lid primer.  I am really looking forward to trying everything, especially since I have been looking for a new eyeliner.  Plus they are a great size to pop in your clutch bag at a party :-)

A huge thank you to Kirsty for organising and to Judith my secret santa.  You really couldn't have picked anything better! 

Make sure to pop over to Judith's blog 'the wee blondie' for a nosey, she has some great reveiws.

Don't forget you can follow me on